
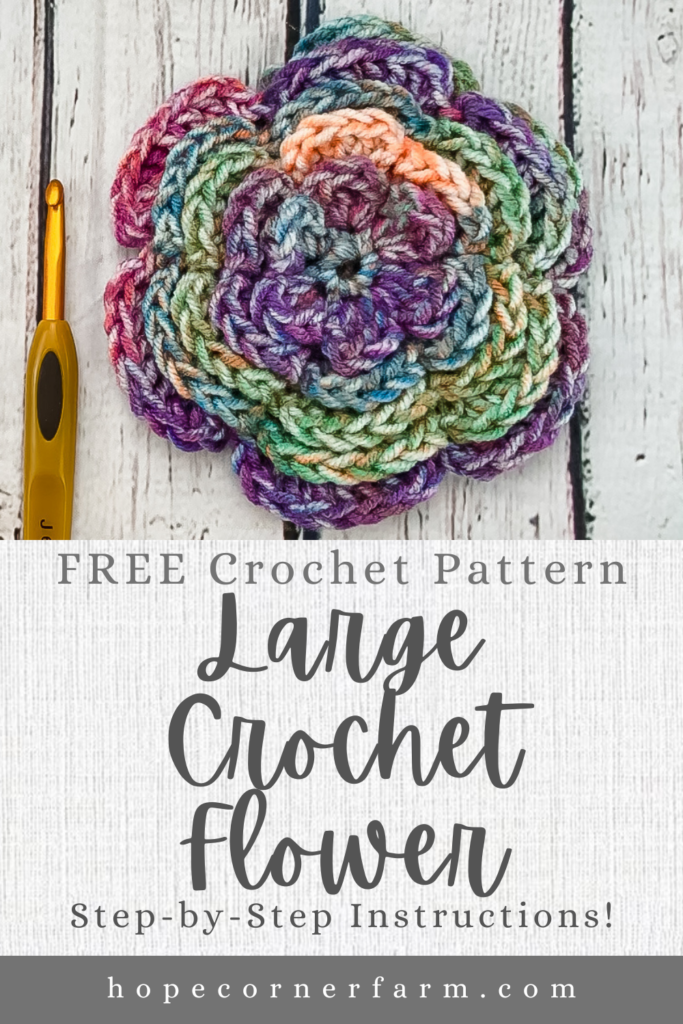
Large Crochet Flower Pattern
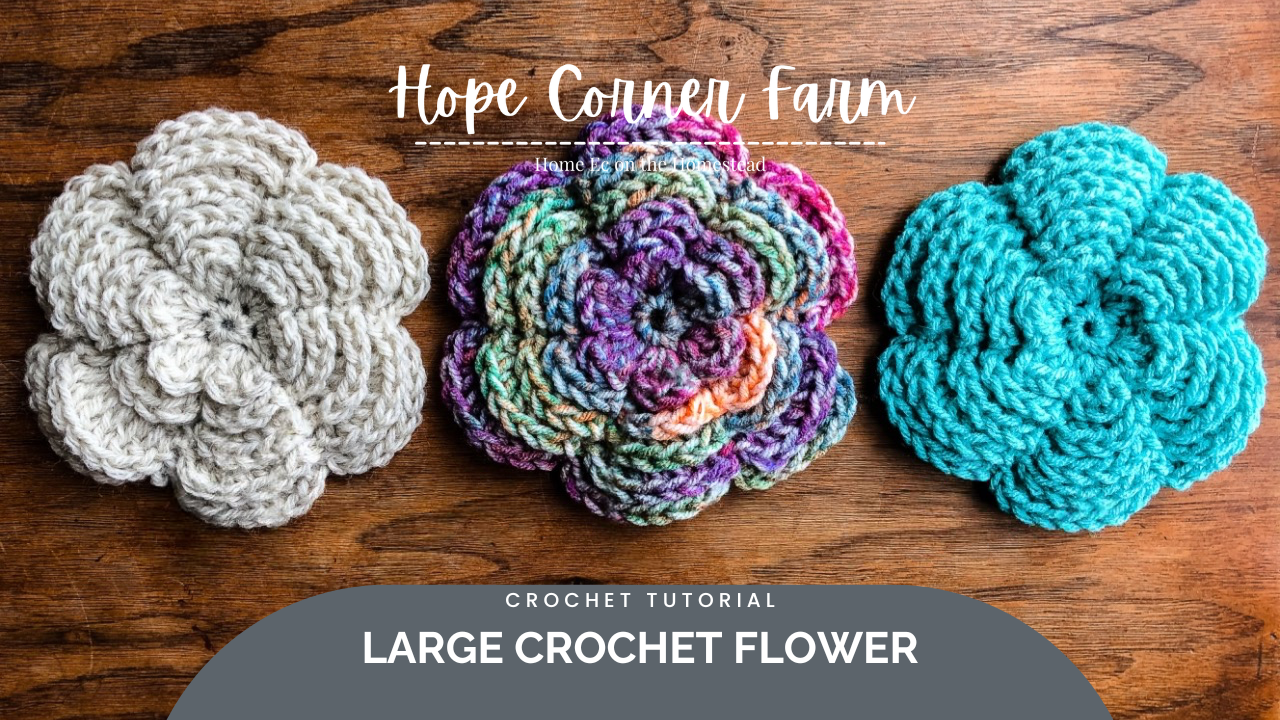

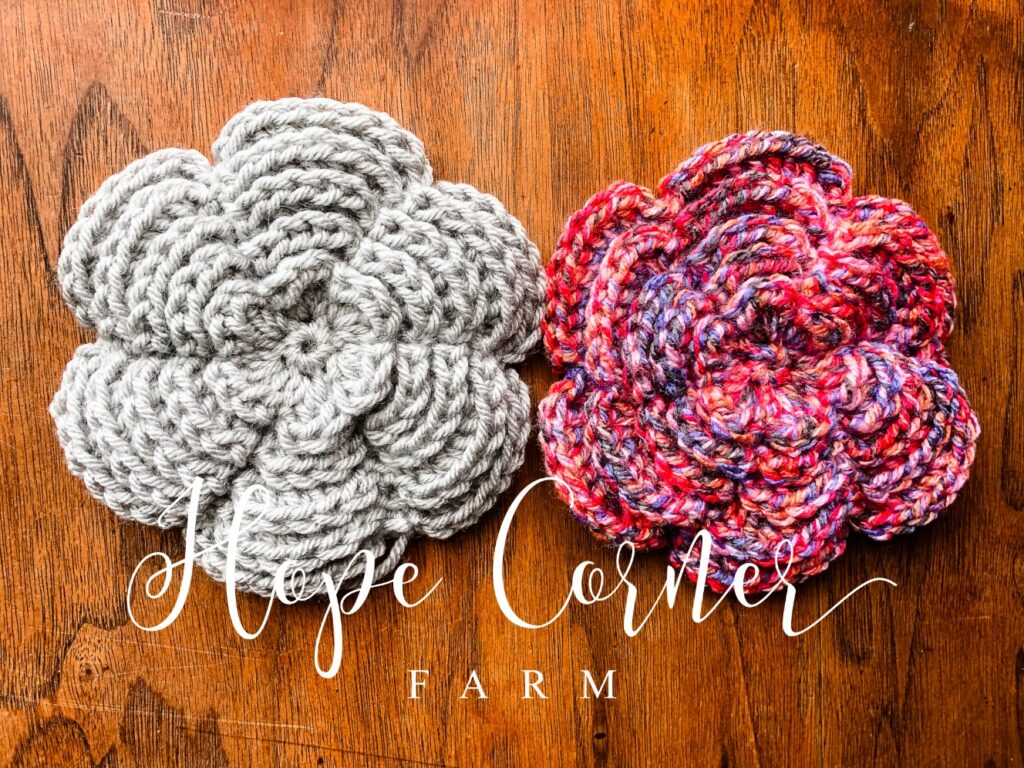
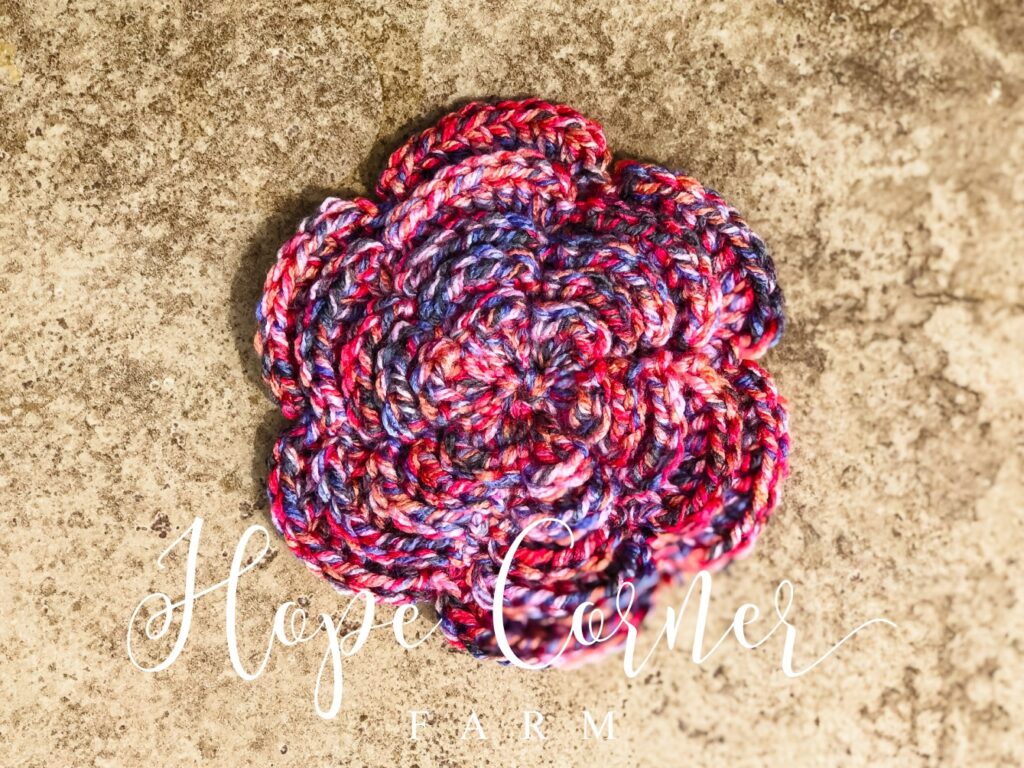
Crochet flowers are my favorite added touch to many crocheted projects. I add them to crochet hats, crochet headbands, crochet blankets, crochet earwarmers, and more! When I first began making crocheted headbands, I had a difficult time finding a flower that I really liked. This flower started me on my journey of pattern designing. This process has taken me time to figure out. There was a lot of ripping out stitches and starting over! I think I have it perfected now! Hopefully you’ll love this large crochet flower pattern as much as I do!


First, check out our video tutorial on our You Tube Channel! Subscribe to get the latest crochet fun from Hope Corner Farm Crochet!
Materials Needed for Large Crochet Flower:
This pattern is in US Crochet Terms
J / 6.0mm crochet hook
Size 4 – Medium weight yarn
Scissors
Tapestry needle (yarn needle)
Crochet Terms Used:
Magic circle (MC) aka Magic Ring (MR)
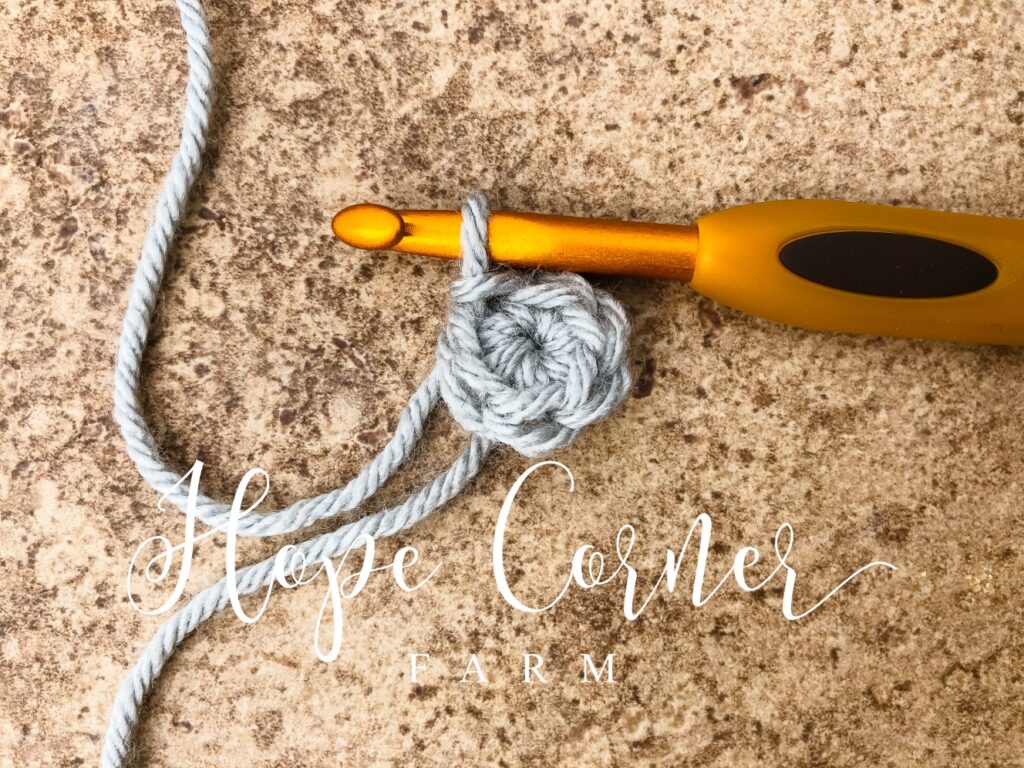
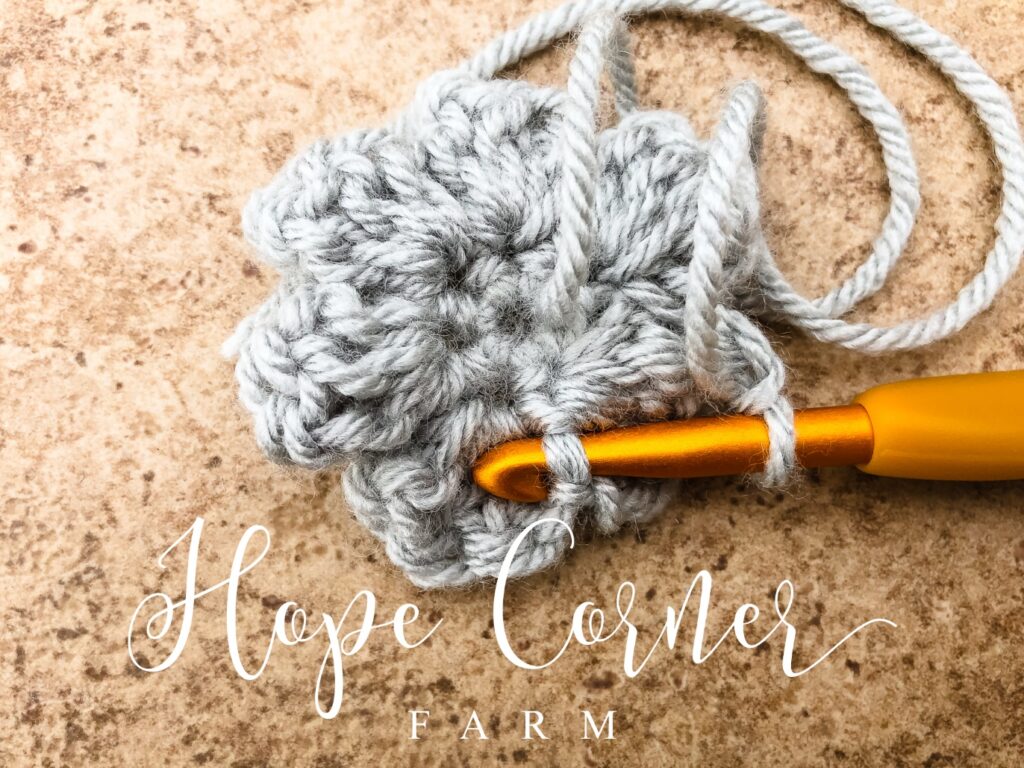
Round 1:
Create a magic circle (or chain 4 and slip stitch to the 1st chain to create a circle). In the magic circle, place 6 sc. Join with a sl st to the 1st sc.
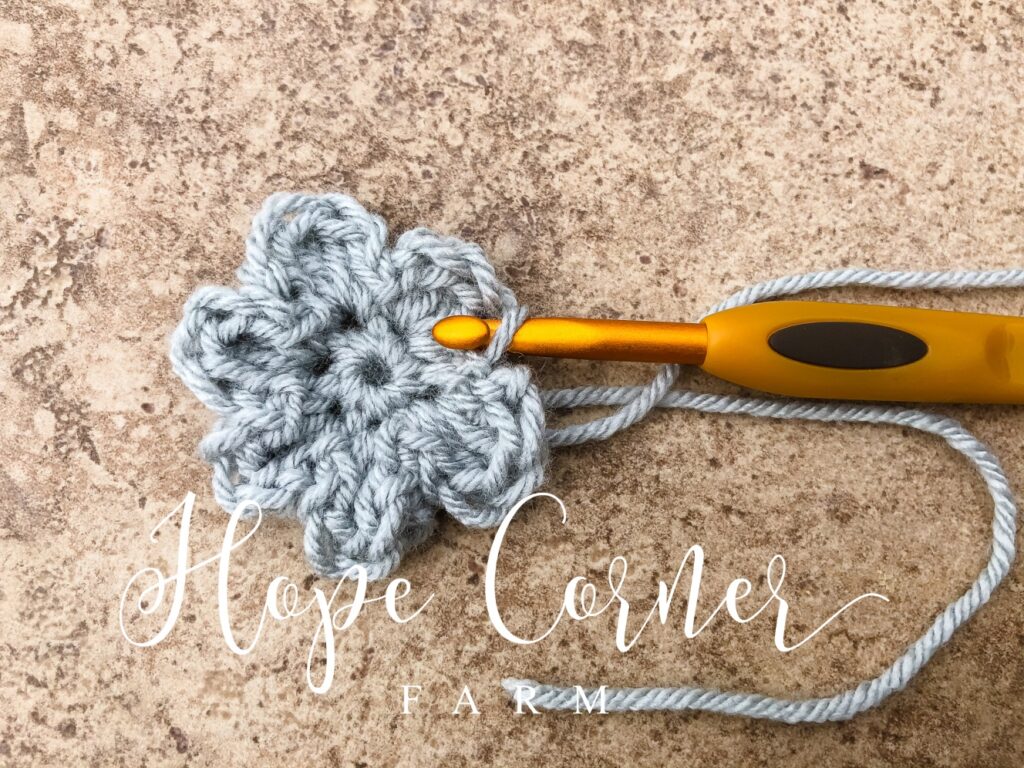
Round 2:
Ch 1, in the same stitch place 3 dc, a ch 1, and a sl st – petal 1. In the next stitch (sc, ch 1, 3 dc, ch 1, sl st) – petal 2. Repeat the steps inside of the ( ) four more times in the next 4 stitches. This will give you 6 flower petals.
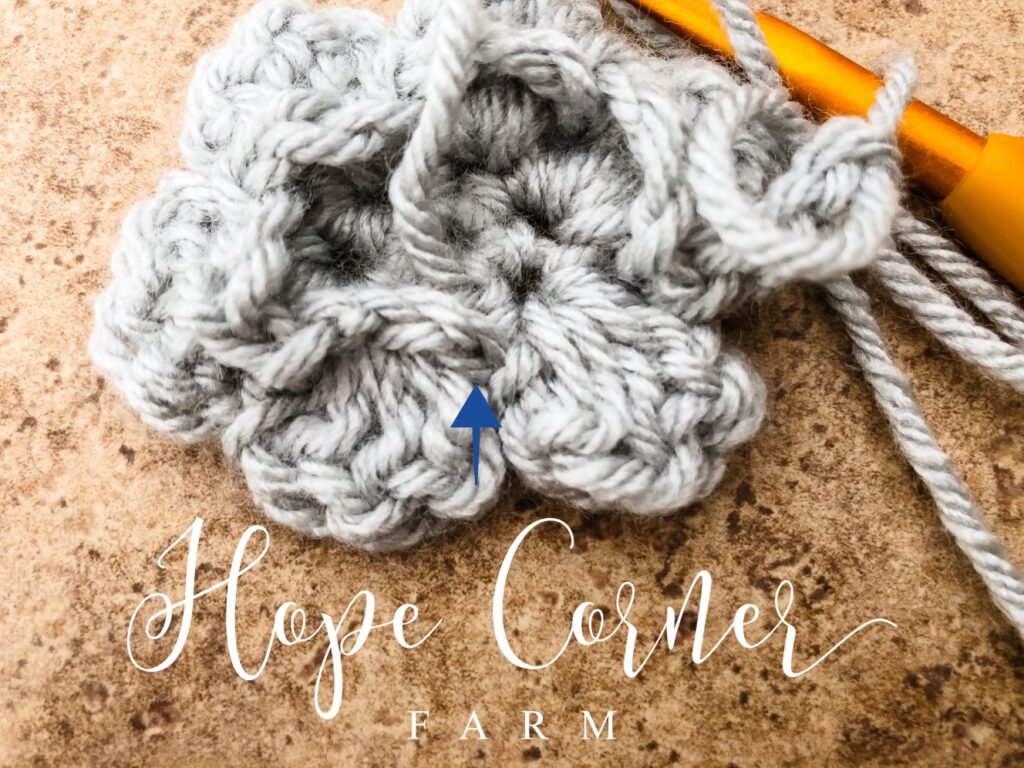
Round 3:
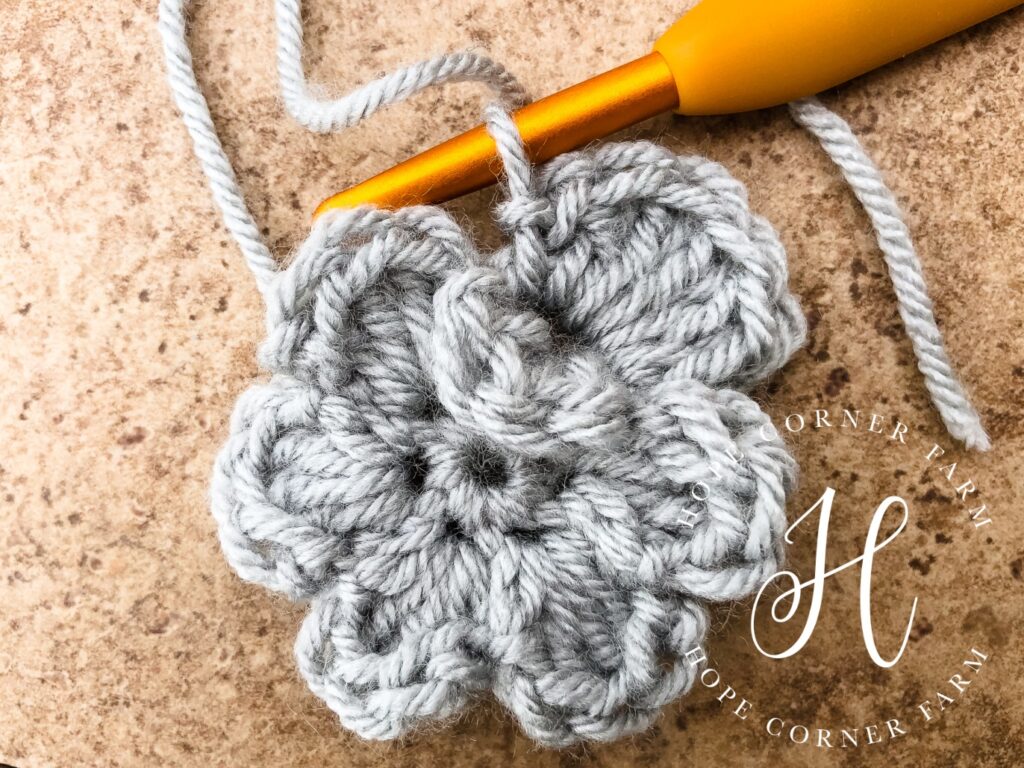
Ch 3, bring the work to the BACKSIDE of the flower and then, sl st around the slip stitch from the previous round (this stitch is the lowest point in between the flower petals – see attached pictures). (Chain 3, sl st around the slip stich from the previous round) 3 more times. Chain 3, and then slip stitch into the first chain from the 1st chain 3 set. This will give you a total of six chain 3 spaces.
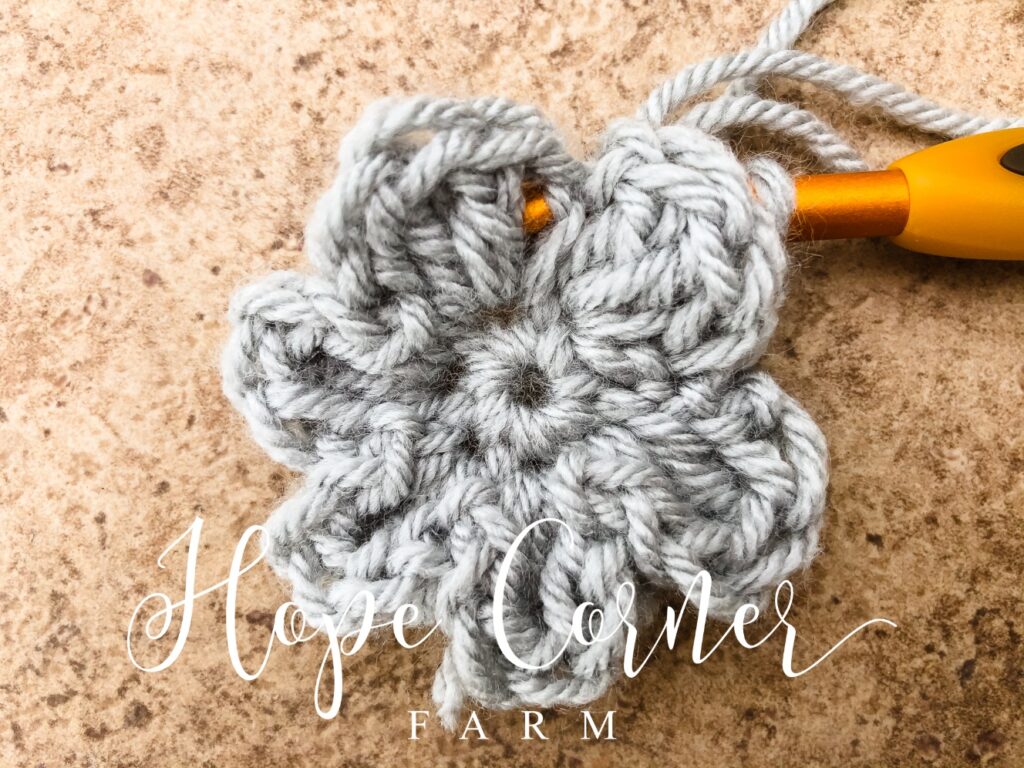
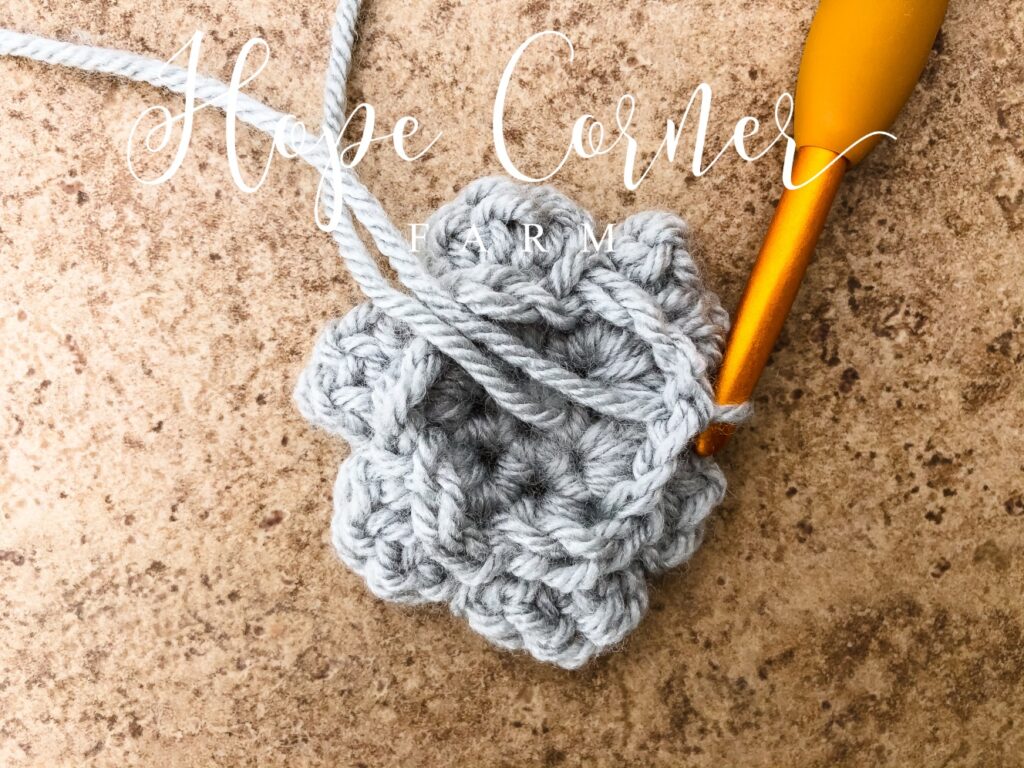
Round 4:
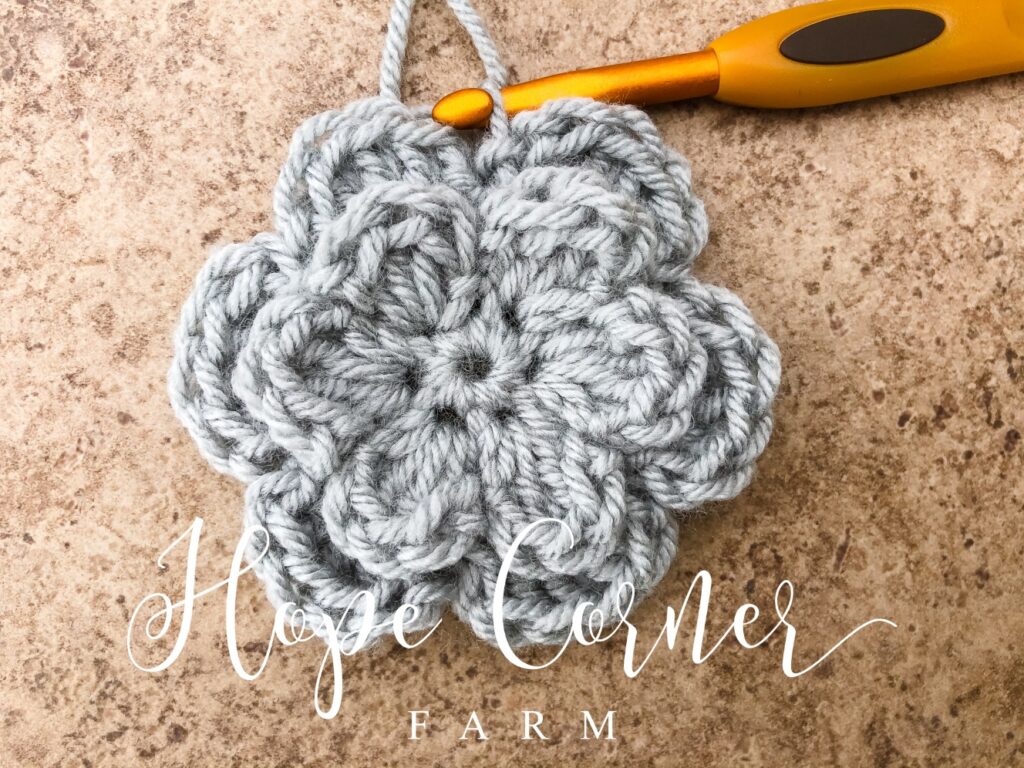
Into the first chain 3 space that we just created, place (sc, ch 1, 4 dc, ch 1, sl st). Repeat 5 times. This will create a second level of flower petals (there will be 6 of them).
Round 5:
Ch 4, bring the work to the BACKSIDE of the flower and then, sl st around the slip stitch from the previous round (this stitch is the lowest point in between the flower petals). (Chain 4, sl st around the slip stich from the previous round) 3 more times. Chain 4, and then slip stitch into the first chain from the 1st chain 4 set. This will give you a total of six chain 4 spaces.
Round 6:
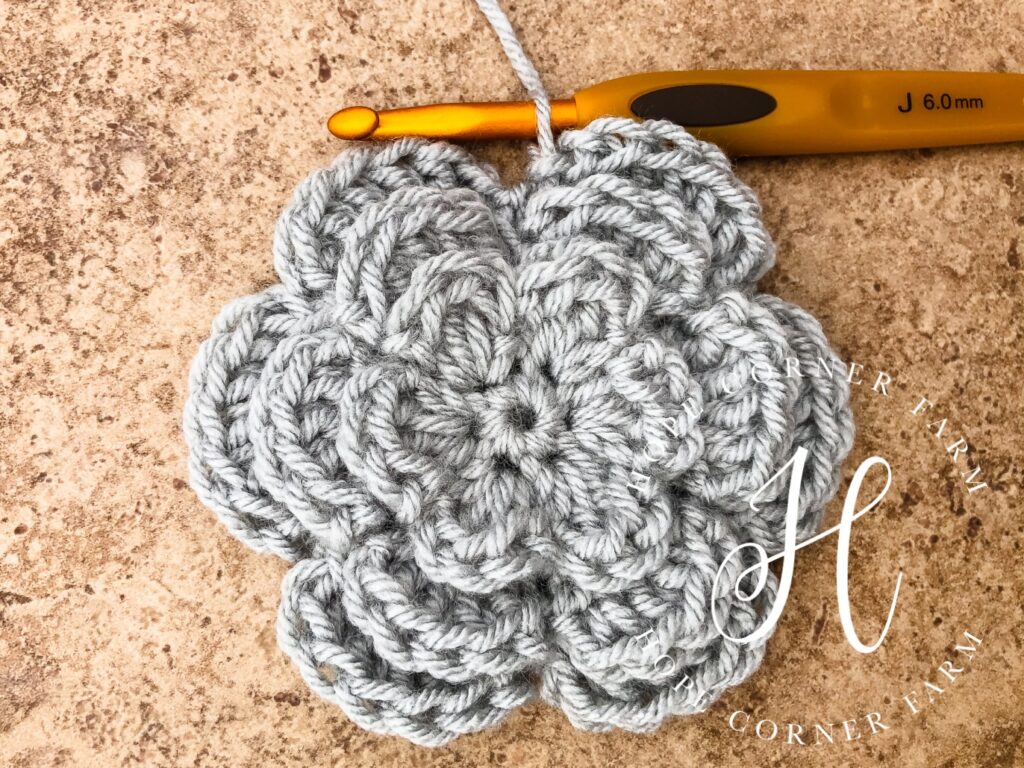
Into the first chain 4 space that we just created, place (sc, ch 1, 5 dc, ch 1, sl st). Repeat 5 times. This will create a third level of flower petals (there will be 6 of them).
Round 7:
Ch 5, bring the work to the BACKSIDE of the flower and then, sl st around the slip stitch from the previous round (this stitch is the lowest point in between the flower petals). (Chain 5, sl st around the slip stich from the previous round) 3 more times. Chain 5, and then slip stitch into the first chain from the 1st chain 4 set. This will give you a total of six chain 5 spaces.
Round 8:
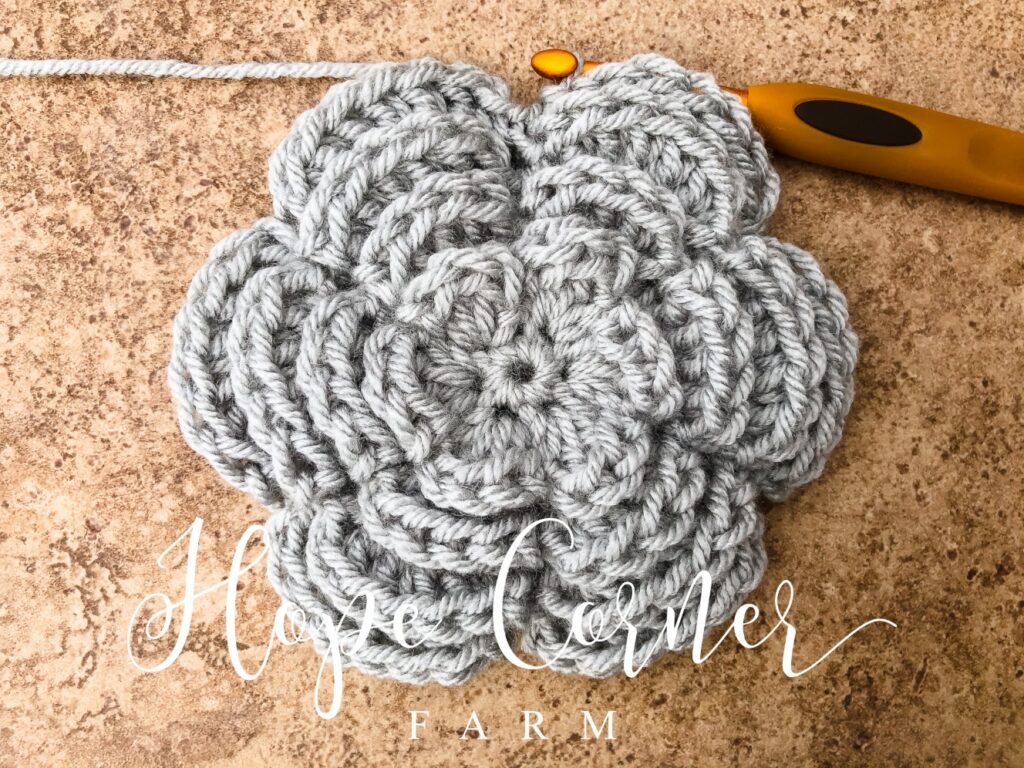
Into the first chain 5 space that we just created, place (sc, ch 1, 6 dc, ch 1, sl st). Repeat 5 times. This will create a fourth level of flower petals (there will be 6 of them).
Round 9:
Ch 6, bring the work to the BACKSIDE of the flower and then, sl st around the slip stitch from the previous round (this stitch is the lowest point in between the flower petals). (Chain 6, sl st around the slip stich from the previous round) 3 more times. Chain 6, and then slip stitch into the first chain from the 1st chain 4 set. This will give you a total of six chain 6 spaces.
Round 10:
Into the first chain 6 space that we just created, place (sc, ch 1, 7 dc, ch 1, sl st). Repeat 5 times. This will create a fifth level of flower petals (there will be 6 of them).
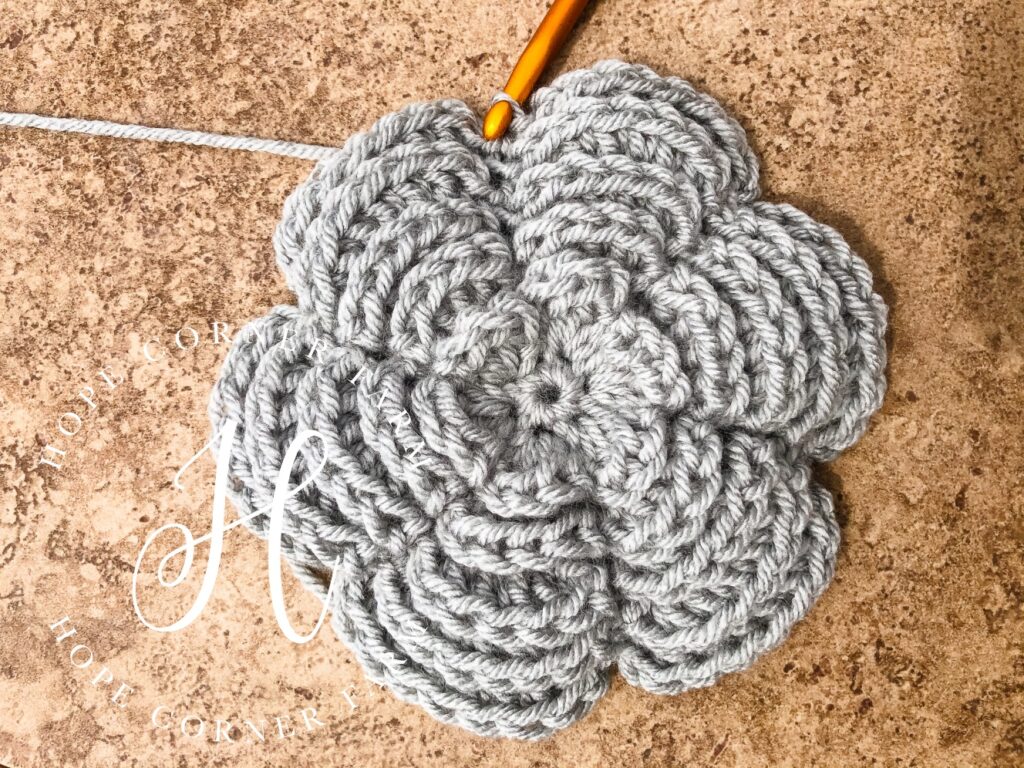
Finishing:
To finish the flower, slip stitch to the first single crochet from the nearest petal. Fasten off the yarn. Cut the yarn. I usually leave a long tail of yarn because most of the time I sew these onto a headband or hat. If you want a finished flower, weave in the ends!
As promised, this large crochet flower pattern uses basic stitches to create a beautiful final product! These are my favorite addition to crocheted headbands and hats.
Enjoy!
Video Tutorial:
Written Pattern:
Round 1:
Create a magic circle (or chain 4 and slip stitch to the 1st chain to create a circle). In the magic circle, place 6 sc. Join with a sl st to the 1st sc.
Round 2:
Ch 1, in the same stitch place 3 dc, a ch 1, and a sl st – petal 1. In the next stitch (sc, ch 1, 3 dc, ch 1, sl st) – petal 2. Repeat the steps inside of the ( ) four more times in the next 4 stitches. This will give you 6 flower petals.
Round 3:
Ch 3, bring the work to the BACKSIDE of the flower and then, sl st around the slip stitch from the previous round (this stitch is the lowest point in between the flower petals – see attached pictures). (Chain 3, sl st around the slip stich from the previous round) 3 more times. Chain 3, and then slip stitch into the first chain from the 1st chain 3 set. This will give you a total of six chain 3 spaces.
Round 4:
Into the first chain 3 space that we just created, place (sc, ch 1, 4 dc, ch 1, sl st). Repeat 5 times. This will create a second level of flower petals (there will be 6 of them).
Round 5:
Ch 4, bring the work to the BACKSIDE of the flower and then, sl st around the slip stitch from the previous round (this stitch is the lowest point in between the flower petals). (Chain 4, sl st around the slip stich from the previous round) 3 more times. Chain 4, and then slip stitch into the first chain from the 1st chain 4 set. This will give you a total of six chain 4 spaces.
Round 6:
Into the first chain 4 space that we just created, place (sc, ch 1, 5 dc, ch 1, sl st). Repeat 5 times. This will create a third level of flower petals (there will be 6 of them).
Round 7:
Ch 5, bring the work to the BACKSIDE of the flower and then, sl st around the slip stitch from the previous round (this stitch is the lowest point in between the flower petals). (Chain 5, sl st around the slip stich from the previous round) 3 more times. Chain 5, and then slip stitch into the first chain from the 1st chain 4 set. This will give you a total of six chain 5 spaces.
Round 8:
Into the first chain 5 space that we just created, place (sc, ch 1, 6 dc, ch 1, sl st). Repeat 5 times. This will create a fourth level of flower petals (there will be 6 of them).
Round 9:
Ch 6, bring the work to the BACKSIDE of the flower and then, sl st around the slip stitch from the previous round (this stitch is the lowest point in between the flower petals). (Chain 6, sl st around the slip stich from the previous round) 3 more times. Chain 6, and then slip stitch into the first chain from the 1st chain 4 set. This will give you a total of six chain 6 spaces.
Round 10:
Into the first chain 6 space that we just created, place (sc, ch 1, 7 dc, ch 1, sl st). Repeat 5 times. This will create a fifth level of flower petals (there will be 6 of them).
Finishing the Large Crochet Flower:
To finish the flower, slip stitch to the first single crochet from the nearest petal. Fasten off the yarn. Cut the yarn. I usually leave a long tail of yarn because most of the time I sew these onto a headband or hat. If you want a finished flower, weave in the ends!
Many Blessings,


Looking for some crochet headbands to add this flower to? Check these out!
Crochet Buffalo Plaid Flower Headband from Hope Corner Farm
Wide Cinch Headband from Hope Corner Farm
Crochet Flower Headband Tutorial on YouTube from Hope Corner Farm Crochet